450 My first heli build ever

j1273

Member
Tarot 450 pro

I lerant the basics of flying with a Kng2. Bought secondhand with all standard radio and electrics.
Consequently though teaching me how to fly it didnt teach me anything about the theory of the electrical side or pitch/throttlte curves etc.

So this is a completely new and exciting experience for me!

Due to a lmited budget, buying everything needed to complete the build has taken half a year but I am finally waiting on the last couple of parts to arrive.
I chose the tarot after many recommednations on another forum. So far Ive been impressed by the apparent quality of the mechanical parts.
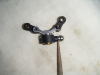
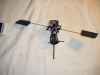
I have completed the tail so far which has raised an issue!! The pitch slider bind terribly. I have tried reaming and smoothing both ends of the brass collet but this hasnt worked at all. As far as I know my only option now is to buy a replacement slider. This will be align!
I had to replace th TT with align because the tarot one was bent and I didnt want to use it.

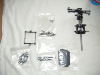
Im putting the following electrics in...
...
nano-tech 2200mah 3S 25~50C Lipo Pack (11911) x2
DS520 Digital Servo (2.5kg 0.07sec) (K10420A) (K10420A)
Scorpion Commander 15V 35A ESC SBEC V3 (SC-35L)
2 In 1 Lipo Voltage Monitor Upto 8S With Buzzer/Alarm (gtbuzz)
Curtis Youngblood Mini G Gyro YEI-YE-MINIG (minig)
trex 450 brushless motor kv3680 (x3680)
Spektrum dx6i tx/rx (not the parkflier rx)

I have taken pics of my workspace and build so far but think theyre a bit boring!!!
Any input gratefully recieved
Jay
 

Tony

Staff member
Looks like you have a pretty good start on the build. What are you going to use for your cyclic servos? And don't worry about boring, anything being built is exciting to see lol.
 

j1273

Member
Oh yeh cyclic!!
Mg90s. I know theyre not great but Im no 3d master!! Im sure they will do me for the first year. I figure I spent good money on tail servo,gyro and esc so mg90s till I can afford better ones.
Ok pics tomorrow. By the way can I use photobucket on here?
Cheers Jay
 

Paulster2

I am El Taco!
Nothing wrong with using MG90S for cyclic servos, especially for the price. As far as photobucket goes, no worries. Just click on the little icon just above the typing area which looks like a tree (dead center of the area, hover over says "Insert Image"). Put the URL of the image in there and away you go. Let me know if you need any help with it.
 

Tony

Staff member
Yeah, those servos will do really well on that heli. You will love it. As Paul said, you can click the "Insert Photo" button in the reply box, or you can just copy the img code from photobucket when you mouse over the photo on their site.
 

j1273

Member
Ok guys thanks
Workspace pics!!!
2011_1011doganbeech0001-1.jpg
note the white sheet as im good at dropping those tiny screws and washers!!! This way they dont bounce and end up in nextdoors garden plus I can see them easier!
During construction(tail)
2011_1011doganbeech0002-1.jpg
The finished product
2011_1011doganbeech0003-1.jpg

Edited by Paulster2: Cleaned up the coding for the IMG's. In the future, if you have the IMG code, just paste it alone within the input box :D
 
Last edited by a moderator:

Lee

Well-Known Member
Exciting times dude. Enjoy the build. Look forward to seeing it in action.
 

Tony

Staff member
Holy crap, you have to be the cleanest builder on this forum hahaha. Looking great though.
 

j1273

Member
Forgot to say.
Of course I am taking apart all factory assembled parts. Cleaning screws and their holes, re-threadlocking and re-building!!
A pain but its something I have been strongly urged to do by everyone!!
My next step is to do this with the head, then see if I can progress with the build some more without the mg90s ( they are on their way).
Oh and my kit didnt come with a manual so I downloaded the Align one which so far Ive found easy to follow.
Im a heavy handed scaffolder and soldering is NOT my forte!!! Expect some screaming posts about how Ive burnt my elbows and got thousands of little metal balls all over the floor and a pile of melted deans connectors!!
Jay
 

Tony

Staff member
I thought I had a "How To Solder" video out there somewhere. I will have to look for it.

As for taking everything apart, cleaning and putting it back together, it's a great routine to get into. If I can't find those videos, I will re-edit them and upload them for you. It's pretty easy once you learn the basics. Just takes practice.
 

j1273

Member
Woohoo
My mini g gyro arived today!! AAGGHH another thing for me to program!!
Doesnt look too complicated, not like my esc!
Oh well more learning which is good!
 

j1273

Member
Finally got my replacement tail pitch slider assembly today.
I needed one as I had a seriously binding tail pitch slider.
Fitted it, slightly better but still too stiff for my liking!!
So my friend sudgested to disconnect the ball from the slider arm and test the action of the slider and the rod and arm. When disconnected all work silky smooth independantly.
I noticed when replacing the ball into the slider, that where the arm sits on the ball, the bottom surface fouls very slightly on the slider at the base of the ball. So i did 2 mins of filing of the plastic at the base of the ball and all is cured!!!
Hope i explained well I did struggle with this one lol
Jay
 

Tony

Staff member
Glad you got it all working Jay. You must be like me and looking for perfection in everything. So, where's the video? :biggrin1:
 

j1273

Member
Sorry mate I havent got the equipment for that!! will post pics to accompany this last entry. Ive got to re threadlock some bits any way
You say I must be looking for perfection. Well yes i do but when I said it was binding I mean it was binding bad!!!
Never having built one I dont know how much binding is tolerable so I must achieve minimum binding!!
Still I have learnt another thing in finding this fault.
 
Last edited:

j1273

Member
Right as promised heres a pic to acompany the above post re. Tail pitch slider fix
The tip of the file seen in the pic is pointing to the area I filed to reduce the binding. Hope this is easy to understand as I struggled to expain well!!
http://2012_0213doganbeech0163.jpg
 

Attachments

  • 2012_0213doganbeech0163.jpg
    2012_0213doganbeech0163.jpg
    164.4 KB · Views: 0

coolgabsi

Super Mod & DEAL KING!
If this is Tt... Which I think it is... (if not ignore) look for play in the output shaft of the tail.. The shaft even after snug fit has a play. If in future you go FBL.. That'll great wag. On flybar it's fine with no issues.

Its the same slop on align kits too. They left too much room there.

If there is horizontal play in your tail output shaft like you can pull it a little and it has room to go back, throw a m3 washer there inside the tail case on the output shaft, and it'll fix it.. And don't over tighten or the bearings will ride... :)

Hope this wasnt jibber jabber . Lol
 

j1273

Member
Yes mate is the TT.
I already built the tail a while ago but have just checked the shaft and there is no significant play. Thanks for the heads up!!

So my cyclic servos 3x MG90s are due this week along with 2 lipos and a swash leveller, now I can continue the build.
I decided to take apart the pre assembled head and do all the threadlocking etc and re-assemble.

Before
http://2012_0213doganbeech0169.jpg
After
http://2012_0213doganbeech0170.jpg

All went together ok apart from a few annoying points.
Firstly there is a lot of slop in both mixing arms where the fit to the see saw holder. I have sought advice and decided to loctite the bearings into the mixing arm body. I was told this is what Align do to eliminate slop in parts!!!! OK!!!????
Oh well overall in the head now complete there is very little slop and since my nightmare with the tail, Im pleased to report no binding!!
Another issue I had was the hex inside 2 of the balls for the mixer arm is the wrong size!! My hex driver spun inside it!! Not happy with that!! Luckily 4 spare balls are included!
AlsoI notice the only way the flybar paddles are secured onto the bar is by screwing them onto the bar!! Is that right? Dont they need a locking collar of some sort?
Cheers Jay
 

Attachments

  • 2012_0213doganbeech0169.jpg
    2012_0213doganbeech0169.jpg
    72.2 KB · Views: 0
  • 2012_0213doganbeech0170.jpg
    2012_0213doganbeech0170.jpg
    75.1 KB · Views: 0

Tony

Staff member
As long as you didn't get any thread lock inside the bearing, it's perfectly fine to lock them in place. That and as long as you don't need to remove them lol. And nope, the paddles just screw on. Make sure they are exactly in line with the cage though or it will cause all kinds of issues lol. Been there.
 
Top Bottom