After almost a year of planning my solar rig is built and functional. Lets start at the begining with the planning,. I originally started off with a deep cycle battery from Home Depot for boats. After further research what I needed was a golf cart battery. That set me back about $75 USD but thats fine because I still ended up under the cost for a generator. My purpose for this article is to explain what I did to build my system not to explain what all this stuff is. Now if anyone wishes to ask me questions about this system just ask. I will do my best to explain what I know but my knowledge is limited. Google might suite you better.
My system consists of :
The batteries are a crucial part to your system. Take the time and buy what you can afford. You will need at least 2 batteries for a 12v system. You can go to 24v but then you will need to double your batteries and you will need 2 12v solar panels. So concider what you want or need. If your battery has cold cranking amps but are deep cycle , do not get them they will not work for this application. What this means is that the battery is not designed for continuous high amp draws. Cold cranking batteries are designed to provide a short term burst of high amps and then taper off to a lower level. 6v golf cart batteries are ideal for something like this. These batteries are designed for long term high amp output.
Your solar panel is going to be your next important investment. There are three types of panels:
You will need a charge controller for this system to work. I went with a basic PWM charge controller because an MPPT (Maximum Power Point Tracking) controller would be overkill for this setup. MPPT controllers are better suited for home applications where the solar systems are bigger. All I have is a 100W system so I don't have a need for MPPT. Not to say I wont get one I just don't need one right now. Your charge controller will be the brains of your system. It will track the solar power coming in, the voltage state of the batteries, provide power to a constant load and possibly provide power for things like USB and 5v barrel connectors. Charge controllers will detect any issues in your system, now this will be specific to your charge controller. Mine will do some detecting for me.
Lets get this puppy all hooked up. I used a cheap amp install kit from Walmart. I used a 100 amp fuse between the two batteries. Should something go bad between the 2 batteries the fuse should blow and shut down the system. For the 12v leads I ran the 8 AWG wires off the battery terminals. I terminated the red and black wires into their own fuse blocks which are fused at 30 amps each. The fuse blocks are 1 in and 2 out. this allows for two items being tied into the system. I also had to buy 2 sets of battery terminal clamps from Auto Zone. For the charge controller I ran some 14 AWG wire from the 12v battery terminals to the charge controller. Then I snipped one end off of each solar cable, stripped back the insulation and mounted the wires into the solar panel input terminals on the charge controller. Be very aware of which cable is positive and which is negative. I could run a constant load but my batteries need all the power I can get to them.
In the end you will not need as much as I have. One thing to look at is the solar panel. Will you be able to hual a panel in your vehicle to accomplish task? At this point in testing I am not sure how many charge cycles I can get on this system. My prediction at this point is that I will ber able to spend the day at the field and not have to worry much, if at all. I feel confident that I can get an entire day at the field with ou the panel. I'll still take it but I dont think i'll need it.
Big Thank you to Chellee for helping me complete this system and helping me make this come true.
Parts List:
Amazon product Amazon product Amazon product https://www.walmart.com/ip/Scosche-680W-8-Gauge-Wiring-Kit-for-Single-Amps/14667122
Take a look at my final setup picture to see what I did.
Google Album
https://goo.gl/photos/G78xE6PrQkzAC69S9
My goal is to follow this up with some video. We shall see how things go.
Test 1 Sunday April 23, 2017
Test one ended today (20170430) with a total of 9 flight pack cycles and one RX pack cycle, with maybe 10 if i pushed it. For this test I found out that I can get about 9 flights without a solar panel on hand. If I leave the house with three fully charged packs, head to the field I should see about 12 flights without a solar panel.
This is not enough data for me. I want to really test out how many back to back flights I can get in one day. This first test was not done on the same day but over 8 days. My next test will be how many cycles Can I get in one day. My guess will be about 11 or 12.
The flight packs that I used are 4 Pulse Ultra 3000 45C pack and 2 Pulse Ultra 3300 45C packs. My RX pack is something like 1250 30C Pulse RX pack.
Here are some photos of what I am attempting to do. This will be my permanent charging setup. Not sure how I will handle the pl6 and bump controller plus the para boards. Still planning that.

I just finished building the shelf in my Nissan Rogue (in case some of you are wondering.) Nothing fancy just a piece of 1/2 inch Oak Plywood and some pine 1 X 2.5 X 72 inches cut to needed lengths.


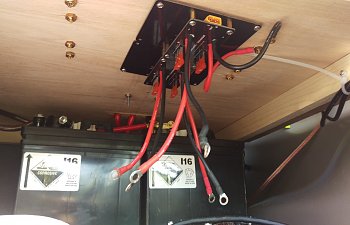
This is the two 6v golf cart batteries that are tied in series. This is where I used that wire from the amp install kit from WalMart. The install kit brand is Scorch

This is my PWM charge controller for the Solar Panel and my PL6. I was playing around with locations for the PL6.


This is just an in process shot of the layout to this point.

This is how the main battery leads will connect to the para board through the binding posts. This part of the modular para board connects to the charger via XT90 or 60, I can not remember. I finally settled on how the binding posts were going to be mounted.

This is the modular balance boards from Progressive RC. Just showing how i'll connect my batteries to the binding posts. I made the connectors leads for charging.

Everything is hooked up and powered up. My VControl is in its final storage place

Final layout with everything hooked and ready to go.
Today 20170513 I got a video update for this article. Sorry about the video being sideways. This is my first video on this new phone. Shortly after I started filming my phone rings and text message goes off. Try to ignore that. When I get the chance i will retake the video.
My system consists of :
- 2 6V 227 amp hour golf cart batteries
- 1 100v 6 Amp (Max ouput) Solar panel
- 1 Charge controller
- 2 Solar cables
- Amp wire kit
- and other materials that were added later.
- Revolectrix PowerLab PL6
- Revolectrix Bump Conctroller for the PL# serise chargers
- Progresive RC Modular Para Boards (solder your own connector style) x2
- Progressive RC Binding Posts X4 Red, X4 Black
The batteries are a crucial part to your system. Take the time and buy what you can afford. You will need at least 2 batteries for a 12v system. You can go to 24v but then you will need to double your batteries and you will need 2 12v solar panels. So concider what you want or need. If your battery has cold cranking amps but are deep cycle , do not get them they will not work for this application. What this means is that the battery is not designed for continuous high amp draws. Cold cranking batteries are designed to provide a short term burst of high amps and then taper off to a lower level. 6v golf cart batteries are ideal for something like this. These batteries are designed for long term high amp output.
Your solar panel is going to be your next important investment. There are three types of panels:
- Thin film (i.e. Harbour freight 45W complete system, least efficeint and not woth the mone).
- Monocrystaline is more expensive and more effecient over thin film and has a longer life span
- Polycrystaline is the most expensive but outperforms the Mono panel and tend to be slightly smaller than Mono panels because of their efficiencies.
You will need a charge controller for this system to work. I went with a basic PWM charge controller because an MPPT (Maximum Power Point Tracking) controller would be overkill for this setup. MPPT controllers are better suited for home applications where the solar systems are bigger. All I have is a 100W system so I don't have a need for MPPT. Not to say I wont get one I just don't need one right now. Your charge controller will be the brains of your system. It will track the solar power coming in, the voltage state of the batteries, provide power to a constant load and possibly provide power for things like USB and 5v barrel connectors. Charge controllers will detect any issues in your system, now this will be specific to your charge controller. Mine will do some detecting for me.
Lets get this puppy all hooked up. I used a cheap amp install kit from Walmart. I used a 100 amp fuse between the two batteries. Should something go bad between the 2 batteries the fuse should blow and shut down the system. For the 12v leads I ran the 8 AWG wires off the battery terminals. I terminated the red and black wires into their own fuse blocks which are fused at 30 amps each. The fuse blocks are 1 in and 2 out. this allows for two items being tied into the system. I also had to buy 2 sets of battery terminal clamps from Auto Zone. For the charge controller I ran some 14 AWG wire from the 12v battery terminals to the charge controller. Then I snipped one end off of each solar cable, stripped back the insulation and mounted the wires into the solar panel input terminals on the charge controller. Be very aware of which cable is positive and which is negative. I could run a constant load but my batteries need all the power I can get to them.
In the end you will not need as much as I have. One thing to look at is the solar panel. Will you be able to hual a panel in your vehicle to accomplish task? At this point in testing I am not sure how many charge cycles I can get on this system. My prediction at this point is that I will ber able to spend the day at the field and not have to worry much, if at all. I feel confident that I can get an entire day at the field with ou the panel. I'll still take it but I dont think i'll need it.
Big Thank you to Chellee for helping me complete this system and helping me make this come true.
Parts List:
Amazon product Amazon product Amazon product https://www.walmart.com/ip/Scosche-680W-8-Gauge-Wiring-Kit-for-Single-Amps/14667122
Take a look at my final setup picture to see what I did.
Google Album
https://goo.gl/photos/G78xE6PrQkzAC69S9
My goal is to follow this up with some video. We shall see how things go.
Test 1 Sunday April 23, 2017
Test one ended today (20170430) with a total of 9 flight pack cycles and one RX pack cycle, with maybe 10 if i pushed it. For this test I found out that I can get about 9 flights without a solar panel on hand. If I leave the house with three fully charged packs, head to the field I should see about 12 flights without a solar panel.
This is not enough data for me. I want to really test out how many back to back flights I can get in one day. This first test was not done on the same day but over 8 days. My next test will be how many cycles Can I get in one day. My guess will be about 11 or 12.
The flight packs that I used are 4 Pulse Ultra 3000 45C pack and 2 Pulse Ultra 3300 45C packs. My RX pack is something like 1250 30C Pulse RX pack.
Here are some photos of what I am attempting to do. This will be my permanent charging setup. Not sure how I will handle the pl6 and bump controller plus the para boards. Still planning that.
I just finished building the shelf in my Nissan Rogue (in case some of you are wondering.) Nothing fancy just a piece of 1/2 inch Oak Plywood and some pine 1 X 2.5 X 72 inches cut to needed lengths.
This is the two 6v golf cart batteries that are tied in series. This is where I used that wire from the amp install kit from WalMart. The install kit brand is Scorch
This is my PWM charge controller for the Solar Panel and my PL6. I was playing around with locations for the PL6.
This is just an in process shot of the layout to this point.
This is how the main battery leads will connect to the para board through the binding posts. This part of the modular para board connects to the charger via XT90 or 60, I can not remember. I finally settled on how the binding posts were going to be mounted.
This is the modular balance boards from Progressive RC. Just showing how i'll connect my batteries to the binding posts. I made the connectors leads for charging.
Everything is hooked up and powered up. My VControl is in its final storage place
Final layout with everything hooked and ready to go.
Today 20170513 I got a video update for this article. Sorry about the video being sideways. This is my first video on this new phone. Shortly after I started filming my phone rings and text message goes off. Try to ignore that. When I get the chance i will retake the video.