Velos Rotors 880 Rebuild

Heliman450

Well-Known Member
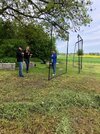
Hi all, the inevitable has finally happened and my VR 880 is in need of a rebuild. As it isn't in production any longer, I'm looking forward to the challenge of getting it back into the air. Can't say how long it will take me but there isn't really any rush.

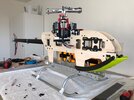
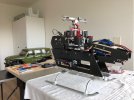
I produced a very useful mock-up using plywood and am expecting version #2 to be handed back tomorrow from a friend who's been helping out with the cutting/drilling in his workshop. Next phase is to mount all the electronics in their new location and to scope out the wiring runs before creating the CAD drawing for the new CF frames.

I've maximised the use of standard parts up to now and the SAB 700 RAW has been very good as a source. I'm expecting delivery of the new landing gear tomorrow so I can exercise the little grey cells on how to best join the top and bottom bits.

Up to now, I'm still in credit on the payout from my insurance company of just over $3,000 having paid out around $1,000 to my main supplier Hugo (Modellsport.ch | Startseite | Der Onlineshop).

I'll keep you posted depending upon interest shown.
 

Smoggie

Well-Known Member
Oh no :nightmare: what happened to the 880?

I thought that Velos were continuing to make spare parts to order, or is that no longer the case?
 

Heliman450

Well-Known Member
Hi Steve, I contacted them some time ago during my original build for some missing parts and was told that only the mechanical parts are still available. They didn't mention about making anything to order. However, they did send me a package of some stuff that was left over from the hobby prototype...... I've still got them.

There were many aspects of the original frame that I wasn't happy about e.g. that the two ESC's were mounted along the length of the body. One was bent almost like a banana and the other was crushed at the front. The new position will be to each side and the front batteries will be slung underneath using the parts from the 700 Raw. The rear batteries will be almost as before but I'm hoping to drop the trays slightly to allow them to be moved forwards. The original was very tail heavy and bringing the CoG forwards was very difficult needing a new front battery tray but it was restricted by the taper of the canopy from going any further forwards. The extra large custom-made landing skids were the clinching points for achieving balance. I have the two new plywood main frames back from my colleague so will be drilling the holes to mount the electronics during this afternoon.

What happened? A long story, let's just say that it was my own fault (it always is) and I have already adopted a new process for gaining access to the helipad without it happening again. I attach two photos, the last picture of the 880 in flight and the main contributing factor to the incident. I was maneuvering through the narrow gap in our recently installed safety nets and activated a switch without noticing. Luckily the insurance payout will mostly cover the rebuild if I don't go too crazy with the custom-made parts.
 

Attachments

  • 01_880 In Flight.JPG
    01_880 In Flight.JPG
    215 KB · Views: 10
  • 03_Safety Nets.jpg
    03_Safety Nets.jpg
    129.2 KB · Views: 10

Smoggie

Well-Known Member
That must be a great insurance policy you have there. I've never heard of one that would cover you for accidental damage in actual use.
 

Heliman450

Well-Known Member
It's part of my home insurance for my 'sport equipment'. Up to 5,000CHF per crash claim and up to 20,000CHF if the contents of my vehicle is stolen in Switzerland and double if abroad. It costs me an extra 350CHF per year on my policy. I reckon it's extremely good value for money.

I'm not sure how many crashes per year but I don't really want to find out in practice :bellyroll:
 

Heliman450

Well-Known Member
Latest update.....

I've managed to get it standing on some landing gear and can begin to study things in more detail, plan wiring routes etc. It doesn't exactly look pretty and is a bit wobbly but at least it can be lifted around and not be just a pile of bits.
 

Attachments

  • 880 Plus L_Gear.jpg
    880 Plus L_Gear.jpg
    91.2 KB · Views: 11

Heliman450

Well-Known Member
Hi all,

Things were looking good up until about 4 weeks ago :banghead:

Then my friend with the milling machine suffered the loss of his father so my rebuild project has come to an unfortunate stop. No problem, only my progress is going to be slower as a result. Hey, the new flying season is beginning and things are looking up.
 

Heliman450

Well-Known Member
In the meantime, I've soldered up the link wire for the rear pair of batteries. I've decided to mount the two ESC's up front within the frame but this time on the top rather than underneath the heavy stuff in the hope that if it does suffer a similar fate then they should be launched away from the main body rather than staying locked away to be crushed underneath. The ESc's were the second most expensive replacement after the four 6S batteries, which fortunately didn't catch fire but were too badly damaged to be kept.

I wonder if I should use the first carbon fibre frames for a crash test :banana:
 

Heliman450

Well-Known Member
I forgot to mention the tail drive belt story.....

The tail boom sheared off at the housing leaving it about four inches shorter. There was no other damage so I've kept it albeit that it's now a 'custom-sized' item. I gained two spare drive belts from V-R but both are now superfluous being too long. Hugo suggested I try a local company to make me a special length item, which turned out to be a dead end. On the bright side, I learned a great deal about drive belts and after a bit of searching around discovered that the drive belt of a SAB Nitro fits perfectly at 2004mm long. These turned out to be a bit difficult to source and I went with a UK supplier rather than wait for Hugo to order me two. I've now got a service item and a spare from two different suppliers.

I suspect that if the tail boom breaks again, I'll just have three useless belts unless I can come up with a new tail boom to fit the belts :arms:
 

Heliman450

Well-Known Member
Back in the correct thread.......

The six parts that will make up the new frames are ready to be machined in plywood as the final test before producing them in carbon fibre. There's no finish date for the final plywood versions yet, fingers crossed that it will be soon. Next job is a strip-down ready for reassembly.

The main development was to modify the nose having decided to ditch my idea to use the drop front for the battery compartment from the SAB 700 Raw. The main reason for this being that it required 70mm width and the main frame is 60mm. I decided that my design for achieving the difference just wasn't worth the effort and probably wouldn't have looked good anyway. At least with the next stage I'll be able to complete the wiring on the mock-up. There will also be a 3D-printed mounting for my Geo-link unit. The tail boom is from 40mm diameter carbon and Hugo only had mountings for the wimpy tail booms from other helis.

Watch this space...
 

Heliman450

Well-Known Member
Latest update......

I'm waiting for the next version of the frames (hopefully) before they are created in carbon. The previous version from the earlier picture is now all stripped ready for assembly. I have all the necessary bits and pieces, although, the cables need to be finalised for length and the remaining connections soldered. I don't expect there to be any change to the overall dimensions but maybe there's a hole that's in the wrong place or needs to be larger.

I'm not making any forecast for when the maiden will take place :biggrin1:
 

Heliman450

Well-Known Member
Frames collected...... cleaned ready for deburring and initial assembly. Photo(s) to come...... watch this space
 

Heliman450

Well-Known Member
So here it is in carbon. Still more to do such as resizing the chassis to match the landing gear as the lower frame is a bit thicker (3.2mm) than the previous plywood versions and it's the easiest part to modify costing only another $3 to replace the aluminium profile.

After this, the next phase will be finalising the cable lengths and soldering up the connections.
 

Attachments

  • Phoenix v1.04_27.06.22.jpg
    Phoenix v1.04_27.06.22.jpg
    90.1 KB · Views: 7
Top Bottom