murankar
Staff member
murankar submitted a new Article:
Building The Load Bank
Read more about this article here...
Building The Load Bank
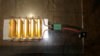
View attachment 20817
need to update this when I get home. More to come.
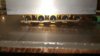
As of right now the load bank is built and almost completely wired. Again i will be doing a in depth write up of today's progress.
Read more about this article here...