I spent over a week looking for just the right plane. I didn't want another trainer, they are too slow and you can't really do anything with them other than basic flying. I was going to get a WWII war bird, but decided that I didn't want to invest that much time in building a kit, as well as the added demands on my bank account with a nitro engine. So, I decided the plane that I needed was a 3D plane.
The mid wing planes will do just about everything you want them to do. Hover, loops, rolls, snap rolls, hammerheads, you name it. This was exactly what I wanted. So, I started looking at them. I tried to keep an open mind and looked at the Yak, Edge, Extra, and some others that I can not remember. Just going off of pure looks (as I have never flown one), The Edge 540 looks great. I read review after review of this plane, and everything is good.
When this plane first came out back in '08, there were many problems with broken spars in the fuse, and even more reports of broken rudders. This was not the case with my plane. Everything came out of the box in perfect shape. The MonoKote is some of the best that I have seen. Only a couple very slight wrinkles in the whole plane. It was overtightened on one of the elevators and actually bent the wood out of shape, but this is an easy fix with a heat gun.
So what do we have when we open the boxes? Yes, I said boxES. Everything came in a large box. In there was another large box, and all of my extras that I ordered. I took all of the stuff out of the outter large box. I noticed that the big box inside the large box was opened. Oh goodie, something is going to be missing. I look in the big box, and there is the box with the plane in it. I know this, because it has the pictures on the outside
 . I did put my EXI 450 Pro TT on top of the box to give you a size comparison. The box was quite large.
As you open up the box, you will first see The sticker sheet, or the instruction manual. They are in the same package. Mine was sticker side up.

Under that is the wings, and the horizontal Stab.

Once you take the covering off that the wings were sitting on, you will see the fuse, CF wing joiner, nose piece, and wheel Pants. You have to open up the boxes on each end to release the fuse.

Under the rudder in the box it was in, you will find all of the other hardware.

Here is a close-up shot of the decal sheet, and the instruction booklet.


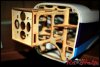
The first thing that you will notice, is that where this plane needs to be strong, it is. But, where it doesn't, it's not. There are 6 strips of carbon fiber running down the sides of the fuse. This is not only very light, but also very strong. In the pictures below, you will see how this plane is constructed.


If you need a blind nut to screw into, it's already there. Including the 4 for the motor mount, and the 6 for the landing gears

The front nose it held into place with 4 strong magnets. If you are going to be doing any 3D though, use some tape to hold it in place. The canopy is held on with 7. It's funny, the canopy is lighter than the nose, yet uses more magnets.

The battery tray is more than big enough to handle any battery you want to stuff in this plane. I'm going to be using a 4s, 2200mah pack.

Here you see where the elevator goes. You have to line it up, measuring to make sure it's square to the plane, then mark it and remove the MonoKote. Once that is done, you put it back in the fuse, leaving it 1/2" sticking out one side. Mix up some epoxy, spread it on the top and bottom, push it through 1/2" over to the other side, coat that side top and bottom, then recenter it. Make sure you measure many times. If this wing is off just a little, it will affect flight performance.

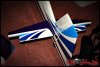
And when we say that this thing has some deflection to the control surfaces, we mean it.

If you are worried about cooling, dont be. There are large openings in the front of the nose, as well as on the under side of it, then there are good size holes on the under side of the fuse. This will cool any setup that you may have.


Okay, enough showing off everything, it's time to get building. The plane will come with everything needed to put it together less the electronics. And there are a bunch of parts lol.

I started with the landing gears. The instructions say to start with the wings, but I couldn't do that. Why? because the servos I ordered are too short. I was going to use the MG90S servos for sport flying and light 3D, but they are too small for the holes that are in the plane. So, I'm looking to unload those and pick up the Futaba 3115 servos. They are slower, but about twice as strong. So 3D will be no problem. What is the problem, the price. I paid $7 for the MG90S servos, and the Futaba's cost $20 each. That's $80 worth of servos in this plane. Not something I wanted to spend. But, gotta do what ya gotta do. Anyway, here are the landing gears.


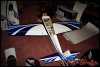
I went ahead and stuck the wings on just to give you a size comparison. The wings just go on with the Cf tube, the little CF dowels that line everything up (anti rotation actually) and two plastic thumb screws. To give you an idea of the size of this plane, here is my mSR in the canopy.


And here are some more with the mSR and mCP-X sitting along side it.


Once I got here, I was stuck until UPS showed up again. Yes AGAIN. He dropped off the plane at about 0900, but didn't have the other box on his truck. So, he had to come back later. No problem, gave me time to build the plane (sorta) and go pick up my daughter from school. So he shows up. This is when I learned of the servo problem and when I started to get a little disapointed that I didn't go ahead and spend the extra money on the servos that I knew would work. My mistake for not reading the sizes lol. I was going to try and maiden this plane this weekend, but that is not going to happen now.
Oh well, it's time to install the motor and ESC. For a motor, I'm running the Tacon Big Foot .32 motor from Hobbypartz. The motor is quite large. Weighing in at over 200g's, it's quite heavy as well. It's a 770kv motor, and with a 4s battery, should do quite well. I am paring this up with the 12x6 APC prop. but after running it for a while, I think I'm going to go with the 13x8 for more pull. Afterall, the motor can handle it lol.
The ESC that I'm running is the Hobbywing 60a with the built in 4a BEC. I thought this was cased in an all aluminum case like the pictures show, but it's not. The heatsink is aluminum, and the stickers that are on the side make it look like the side and bottom are aluminum. They are not, they are plastic. And it's not closed in, it's open on both ends, and venting slots all along the bottom. But that's okay, it's good to have airflow so I don't smoke another one lol. Along with the ESC, I purchased the Hobbywing 2 in 1 Program box. this thing is pretty sweet. Not only does it program the ESC, but it also can be hooked up to your computer to flash the firmware in your ESC if it needs it. You can also program the ESC via your computer if you wish.
Because this plane already had the blind nuts installed for the motor mount, it means that this plane is ment to be used with a certain motor. Well, I didn't want to spend $75 on a motor, so I had to do a little modifying. The holes in the mount on the motor that I purchased were spread too far out, so I grabbed the dremel and went to town. The motor now fits in the stock location. Below are some pics of the motor, ESC, and a close up of the mount.


Once I put the spinner on, I was just about as far as I could go. I could install all of the control horns, but I will leave that until I get the servos. I also need to epoxy and glue the elevator control surfaces on. Not a big deal though. Just put epoxy in the hole where the metal connecting rod goes, and some thin CA on the CA hinges so they don't go flying off lol.
Unfortunately, there will be no maiden for a while. Not until next weekend at least. When that happens, I will either update this article, or I will do a new one on the preflight inspections, servo install, control linkage install, as well as the pull/pull system on the rudder. This will be a great plane once it's in the air. Let me know your opinions.